Unlocking Enhanced Development Experience: Creating Custom Configurations for VS Code Extensions
In the previous blog, I shared my experience of using VS Code Extensions for ROS development. I also discussed some missing functionalities in the VS Code ROS extension, especially the lack of rosbag interface. Well, I dig deeper and figured out the process of creating custom configurations to perform various tasks, including playing rosbags.
Foremost, you need to ensure that you have installed the ROS Extension for VS Code. After you have installed the ROS extension, and restarted your VS Code, you will see a .vscode folder in your ROS workspace. This folder primarily consists of the following files:

- c_cpp_properties.json
It contains the compiler path, C++ standard, and ROS C++ packages path for Intellisense. This file is created by default. - settings.json
It contains project-specific settings like ROS distro, ROS setup script path, and path to ROS Python3 packages for Intellisense. This file is created by default. - launch.json
- This file is not created by default so, you should create a new file inside
.vscodefolder and name itlaunch.json. The file should have the following content in it:
You can add your custom launch configurations inside the{ "version": "0.2.0", "configurations": [ ] }configurationskey, separated by commas. - This file contains debugger settings and helps to specify command-line arguments for debugging.
- You will mostly use this file for executing launch files with the debugger.
- You can use the
start debuggingplay button in theRun and Debugsection to run the debugging tasks.
- This file is not created by default so, you should create a new file inside
- tasks.json
- This file is not created by default so, you should create a new file inside the
.vscodefolder and name ittasks.json. The file should have the following content in it:
You can add your custom task configurations inside the{ "version": "2.0.0", "tasks": [ ] }taskskey, separated by commas. - This file can contain custom build commands and arbitrary (non-build related) tasks where multiple tasks are separated by (
{ }) curly brackets. Each task haskey-value pairsthat include details and the arguments for executing the task. There will be alabelkeyword in each configuration that will be used as an identifier for each task. - To run tasks specified inside the
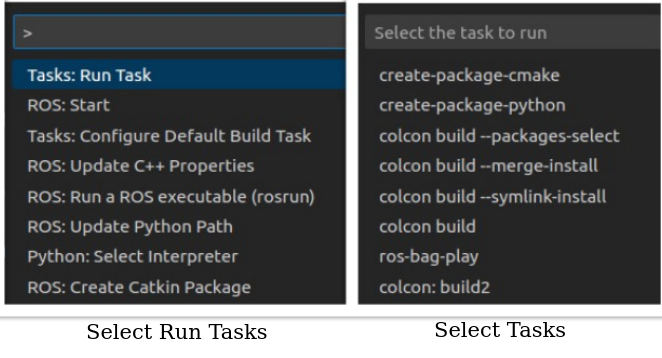
tasks.jsonfile in VS Code, use(CTRL + Shift + P), selectTasks: Run Taskand then select the value of thelabelkey to search that particular task and then pressEnterto run it.
- This file is not created by default so, you should create a new file inside the
Now that you have understood the file system, the following Table of Content provides you with a list of custom configurations. You can copy-paste the configuration inside the specified tasks.json or launch.json files.
For ease of understanding, I am going to demonstrate each configuration using an example of a workspace. I am also providing a GitHub repository containing the example for you to clone and try out various custom functionalities.
TABLE OF CONTENT
- ENVIRONMENT SETUP CONFIGURATIONS
- ROS 2 BAGS PLAYBACK
- BUILD CONFIGURATIONS
- DEBUG CONFIGURATIONS
- UNIT TESTS CONFIGURATIONS
ENVIRONMENT SETUP CONFIGURATIONS
• CREATE, BUILD, AND SOURCE ROS 2 PACKAGES
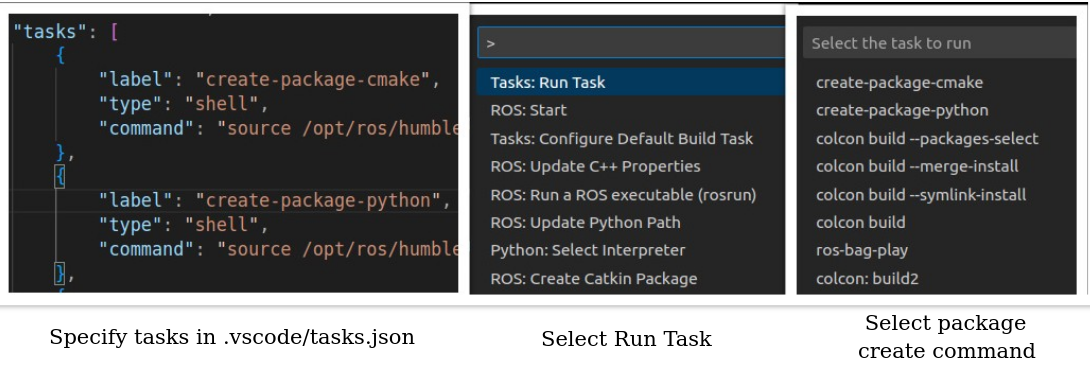
In ROS 2, you can create packages using two different build types, i.e., ament_cmake and ament_python. You need to specify the build type and additional dependencies while creating a package. After your package is created, you need to build and source the workspace. Instead of typing a bunch of commands one after another in the terminal, you can save yourself some time by copy-pasting the below configurations inside the tasks key, separated by commas in the tasks.json file.
-
{
    "label": "create-package-cmake",
    "type": "shell",
    "command": "source /opt/ros/<your_active_ros2_distro>/setup.bash && cd ${workspaceFolder}/src/ && ros2 pkg create <your_new_package_name> --build-type ament_cmake --dependencies rclcpp && cd .. && colcon build --symlink-install && source ${workspaceFolder}/install/setup.bash"
}
For a C++ package, the build type is specified as ament_cmake
-
{
    "label": "create-package-python",
    "type": "shell",
    "command": "source /opt/ros/<your_active_ros2_distro>/setup.bash && cd ${workspaceFolder}/src/ && ros2 pkg create <your_new_package_name> --build-type ament_python --dependencies rclpy && cd .. && colcon build --symlink-install && source ${workspaceFolder}/install/setup.bash"
}
For a Python package, the build type is specified as ament_python
Change the <your_active_ros2_distro> to your active ROS 2 distro while creating your tasks.
Now each time, you want to create a new package, change the <your_new_package_name> to the name of the new package you want to create.
Also, you can add more dependencies like std_msgs after --dependencies , if required.
To run the tasks for package creation, use (CTRL + Shift + P), select Tasks: Run Task and then select the task from the labels. This will create a new package inside your src folder and then build and source the workspace.
ROS 2 BAGS PLAYBACK
One of the major shortcomings of the VS Code extension for ROS is that it does not provide any interface for rosbag. A seasoned ROS developer knows how often they need to play rosbag to tune their algorithms.
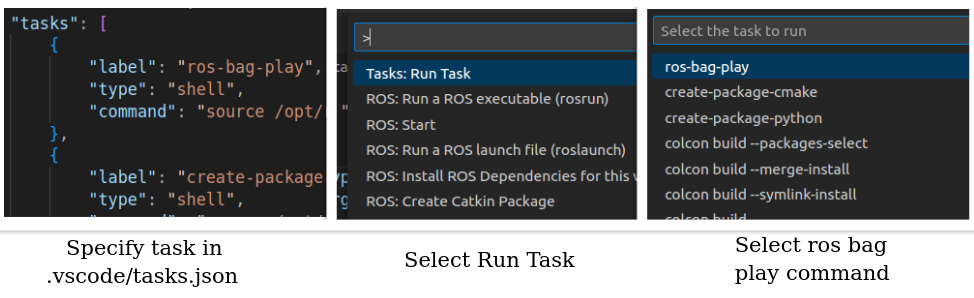
But there is a way out. You can create a task by copy-pasting the below configuration inside the tasks key, in your tasks.json file to play rosbag. Just set the path of the bag file at <set-bag-file-path>.
-
{
    "label": "ros-bag-play",
    "type": "shell",
    "command": "source /opt/ros/<your_active_ros2_distro>/setup.bash && cd ${workspaceFolder}/src/ && ros2 bag play <set-bag-file-path>"
}
Change the <your_active_ros2_distro> to your active ROS 2 distro while creating your tasks.
To run the task for playing the rosbag, use (CTRL + Shift + P), select Tasks: Run Task and then select the ros-bag-play task. This will start playing the rosbag.
BUILD CONFIGURATIONS
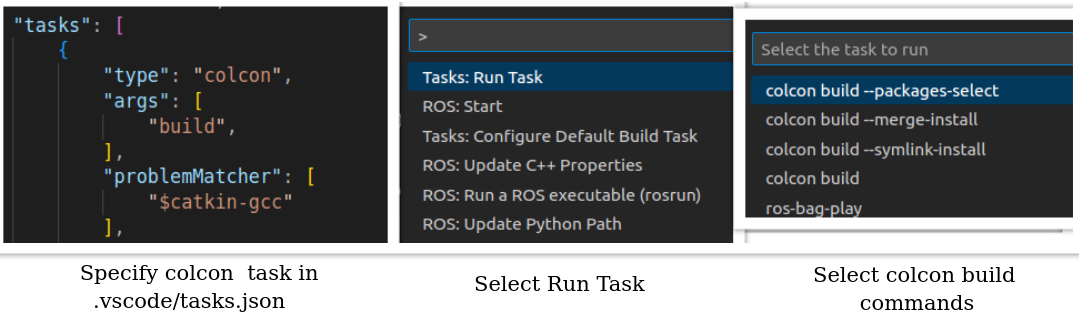
While building a ROS 2 workspace using colcon build, you might be using a combination of arguments. You can add the most commonly used colcon build commands as configurations inside the tasks key in your tasks.json file and execute the build using VS Code.
- colcon build
This will build the workspace using colcon build.{ "type": "colcon", "args": [ "build", ], "problemMatcher": [ "$catkin-gcc" ], "group": "build", "label": "colcon build" } - colcon build –symlink-install
This creates symlink of the executables instead of copying files from the source and build directories where possible. This is especially useful for Python nodes.{ "type": "colcon", "args": [ "build", "--symlink-install", ], "problemMatcher": [ "$catkin-gcc" ], "group": "build", "label": "colcon build --symlink-install" } - colcon build --merge-install
Use${workspace}/installas a prefix for all packages instead of a package specific subdirectory in the install base.{ "type": "colcon", "args": [ "build", "--merge--install", ], "problemMatcher": [ "$catkin-gcc" ], "group": "build", "label": "colcon build --merge--install" } - colcon build --packages-select
You can build a selected number of packages inside your workspace by specifying the packages (separated by space) name after the--packages-selectargument.{ "type": "colcon", "args": [ "build", "--packages-select", "<specify_packages_name_here>", ], "problemMatcher": [ "$catkin-gcc" ], "group": "build", "label": "colcon build --packages-select" } - colcon build (multiple arguments)
You can use multiple arguments withcolcon buildby specifying the arguments inside theargskey in the configuration.
In the below configuration, you can execute two arguments together that will build a selected number of packages inside your workspace by specifying the packages names (separated by space) after the--packages-selectargument and also create symlinks.
The below configuration builds the workspace by creating symlinks and aborts the build process after it gets the first package with any errors.{ "type": "colcon", "args": [ "build", "--symlink-install", "--packages-select", "<specify_packages_name_here>", ], "problemMatcher": [ "$catkin-gcc" ], "group": "build", "label": "colcon build custom 1" }{ "type": "colcon", "args": [ "build", "--symlink-install", "--abort-on-error", ], "problemMatcher": [ "$catkin-gcc" ], "group": "build", "label": "colcon build custom 2" }
To run the different colcon build tasks, use (CTRL + Shift + P), select Tasks: Run Task and then select the build task from the available options.
DEBUG CONFIGURATIONS
Debugging the code you have written is one of the toughest places to be, especially when there is a segmentation fault. While the initial stage of debugging will begin with using ROS Loggers and RViz, using debuggers like GDB for C++ and PDB for Python is essential during code crashes or while dealing with an unknown error.
By using a debugger, you can control the flow of execution line by line and have a peek at variables of interest.
- • Debugging single ROS node using Launch file (Supports C++ and Python nodes)
- The following is an example of a launch file for package name
ros2_cpp_pkgthat launches a single C++ node calledpublisher. The executables in the launch file can be either C++ or Python. - Go to the
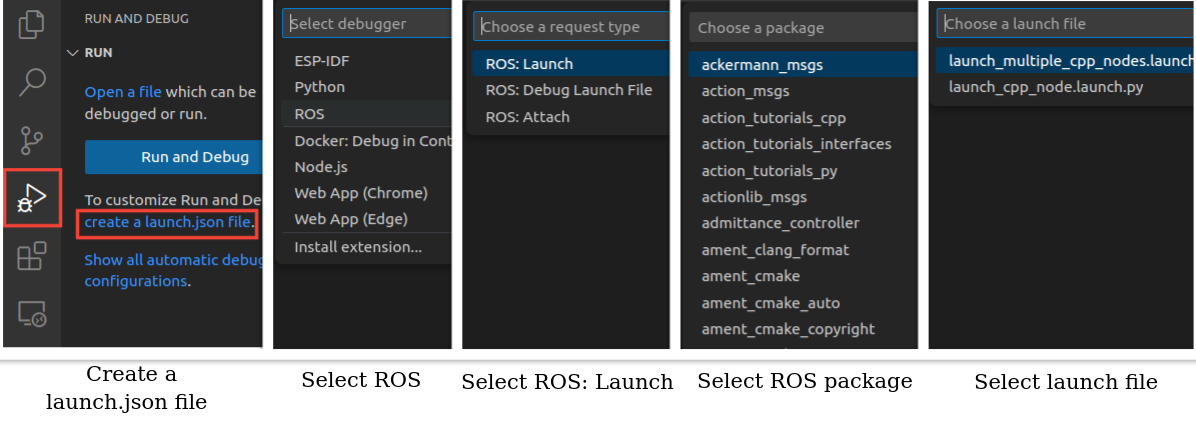
Run and Debug Tabon the left sidebar of VS Code and then click oncreate a launch.json file->ROS->ROS: Launch->Choose a ROS package->Choose a ROS launch filecreated in the previous step. This step will add the location of the launch file from inside theinstallfolder in your workspace. - A new
.vscode/launch.jsonfile will be created containing the configuration for the launch file as a target. If you created alaunch.jsonfile before, you can add the following launch configuration in theconfigurationskey.

Add the name and location of the launch file from inside the{ "name": "ROS: Launch", "request": "launch", "target": "<launch_file_location _inside_install_folder>", "launch": ["rviz", "gz","gzclient","gzserver"], "type": "ros" }installfolder in your workspace at<launch_file_location _inside_install_folder>. An example of a launch file inside your install folder would be<workspace_folder> /install/<package_name>/share/<package_name>/launch/<.py_launch_file_name>.
- The following is an example of a launch file for package name
- Go to the C++/Python code for the executable specified in the launch file and place a
breakpointin the file. - Now go to the
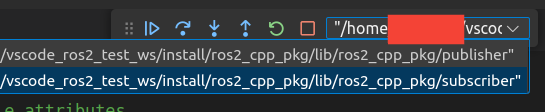
Run and Debug Tabon the left sidebar of VS Code , select the launch configuration from the top drop down menu and click thePlaybutton to begin debugging.


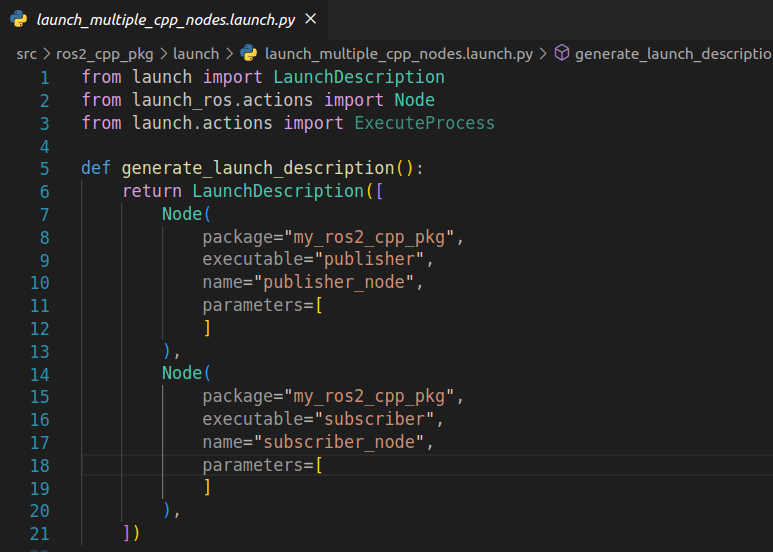
- The following is an example of a launch file that consists of two nodes named
talker_nodeandlistenernode. The launch file can have either C++ and/or Python nodes. - Add the following configuration in the
configurationskey to yourlaunch.jsonfile. Add the name and location of the launch file from inside theinstallfolder in your workspace at<launch_file_location _inside_install_folder>.{ "name": "ROS: Launch Multiple", "request": "launch", "target": "<launch_file_location_inside_install_folder>", "launch": ["rviz", "gz","gzclient","gzserver"], "type": "ros" } - Go to the C++/Python code for the executables specified in the launch file and place a
breakpointin the required files. - Now go to the
Run and Debug Tabon the left sidebar of VS Code , select the launch configuration from the top drop-down menu and click thePlaybutton to begin debugging. - You can switch between different executables from the
debugger menu.

UNIT TEST CONFIGURATIONS
I can’t stress enough on the importance of unit testing for a stable software release process and code maintenance.
ROS 2 provides gtest for testing C++ nodes and pytest for testing Python nodes. colcon provides macros for test-aware compilation and verbs dedicated to testing the project in its entirety. You can execute colcon test to run your unit tests. The test files are generally stored inside a tests folder.
To execute the unit tests for a particular package using colcon test command, give the test folder name and the name of the package at <specify_package_name_here> after --packages-select argument.
-
{
  "type": "colcon",
  "args": [
    "test",
    "--ctest-args",
    “test”,
    "--packages-select",
    “<specify_package_name_here>”,
  ],
  "problemMatcher": [
    "$catkin-gcc"
  ],
  "group": "build",
  "label": "colcon_test"
}
Testing with pytest framework, you can specify the name of the test function at <specify_name_of_ specific_test_function> you created with the colcon test command to test for that specific test function after --pytest-args argument.
-
{
  "type": "colcon",
  "args": [
    "test",
    "--packages-select",
    “<specify_packages_name_here>”,
    "--pytest-args",
    "-k",
    "<specify_name_of_specific_test_function>",
  ],
  "problemMatcher": [
    "$catkin-gcc"
  ],
  "group": "build",
  "label": "colcon_pytest"
}
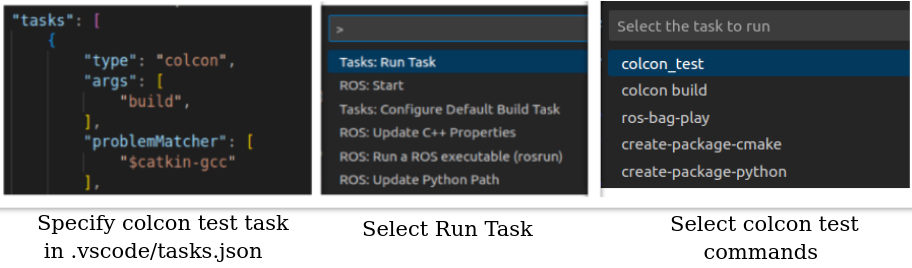
To run the different colcon test tasks, use (CTRL + Shift + P), select Tasks: Run Task and then select the test task from the available options.
Using a debugger with ROS 2 launch_test using the ROS Extension for VS Code is an active problem and has an open issue at the official GitHub repository.
Conclusion
By leveraging the power of VS Code and ROS extension, developers can streamline their coding process, improve productivity, and gain more control over their ROS projects. Whether it's setting up a ROS workspace, configuring build tasks, or utilizing ROS-specific features, understanding these configurations opens up new possibilities for efficient and effective ROS development.
As mentioned previously, you can find the entire configurations from my GitHub repository.
If you want to create a custom configuration, feel free to open a pull request in the GitHub repository. You can also create a Feature Request if you want me to implement your ideas.
Embracing these configurations will undoubtedly empower ROS developers to unleash their full potential and embark on successful robotics projects using the VS Code ecosystem.
If you liked the article, please buy me a ☕️ coffee